Quick Links
-
Why You Should Set Up Different SSIDs for Each Band
-
Setting Up Multiple SSIDs
Key Takeaways
- Separate SSIDs for different bands prevent devices from getting stuck on slower networks.
- Utilizing QoS settings allows prioritization of faster 5/6 GHz networks over 2.4 GHz.
- Adjusting various settings in the router like security, encryption, and channel width optimizes network performance.
Upgrading to a dual or triple-band router is one of the best ways to improve internet connectivity. However, it’s not always easy to tell your new networks apart, especially if they all use the same network name—which is why you should give each Wi-Fi band a separate name.
Why You Should Set Up Different SSIDs for Each Band
Apart from the obvious reason of being able to tell what band you’re connecting to, assigning unique network names to your router’s 2.4, 5, and 6GHz bands has a few advantages.
If you use a single Wi-Fi network (despite having a multi-band router), you won’t get the full benefits of using the 5 or 6 GHz bands. Since the network is merged, your devices try to connect to the best possible band but drop to 2.4GHz as a backup. However, some devices will get stuck on the 2.4GHz network and won’t switch back to the 5 GHz band easily.
Another advantage of creating individual Wi-Fi networks for each is easier use of your router’s QoS settings. You can favor the faster 5GHz and 6GHz networks while also broadcasting the 2.4GHz network for devices that don’t need as much bandwidth.
Separating the two (or three bands if you have a tri-band router) with unique network names means you get a slower backup network running at 2.4GHz and a 5 and/or 6 GHz network. It’s one of the better network practices you should follow, especially when setting up a brand-new router.
Setting Up Multiple SSIDs
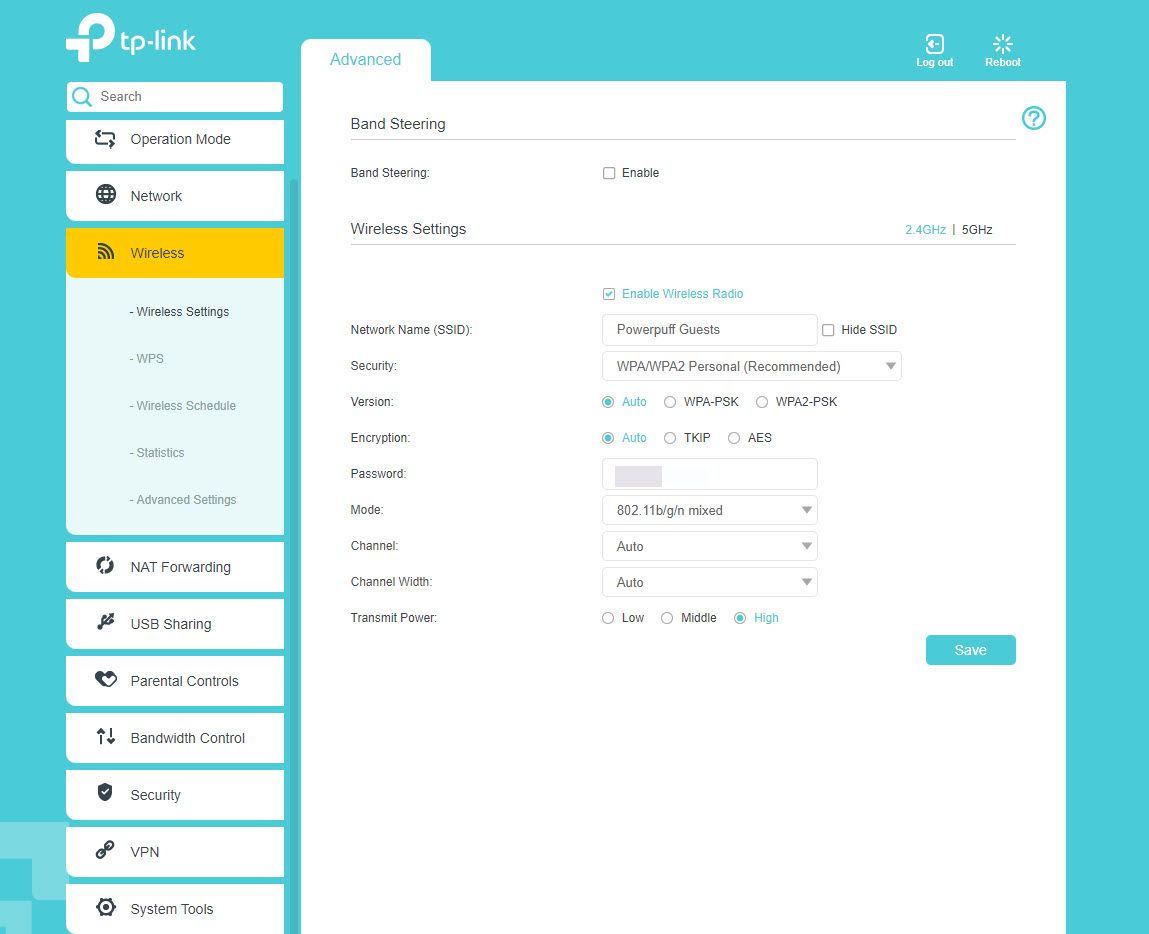
Setting up multiple SSIDs on your specific router varies depending on your manufacturer and model. Generally speaking, you’ll find the settings under a section named “wireless settings.” The settings you can change might also vary, but here are a few common ones.
- Network Name (SSID): Name of the Wi-Fi network running on the chosen band.
- Security: Your options will vary depending on what security features your router supports. For the best result, I recommend you select WPA 2/WPA 3.
- Encryption: Choose the encryption type for your network, generally between TKIP, AES, and an auto mode. It’s recommended that you select AES, but you can go with auto mode if your devices are having trouble connecting to the network.
- Password: Enter your Wi-Fi network’s password here.
- Mode: Select the transmit mode for your router. Your options will vary based on what your router supports, but you’ll typically want to choose the latest Wi-Fi standard or a mixed mode where available.
- Channel: Select the channel to broadcast your Wi-Fi network. Options will depend on the band you’re setting up the network on and what channels your router supports. This can make a difference if you’re trying to boost your Wi-Fi, but you can also set the router to choose automatically.
- Channel Width: Sets the channel width. Options will vary based on your router’s compatibility. Set it to the highest value possible for better speeds at the cost of range. You should be able to set this to be automatically chosen as well.
- Transmit Power: Not all routers will have this feature. I recommend you select the highest power possible to get as much range and network stability as you can.
These are the settings you’ll see when setting up a network on a specific band. However, if you come across a setting you aren’t familiar with, feel free to set it to auto mode. While your router may not do the best job of managing settings properly, you’ll still get the benefit of the different Wi-Fi bands that additional networks offer.
In case you don’t see any settings to change network names based on bands, make sure that the Band Steering setting is disabled. The setting automatically assigns devices to the best available frequency band but merges the 2.4 GHz and higher bands into one network, causing the same problems we’re trying to fix.
With a few minutes and some tweaking, you can create separate networks for separate Wi-Fi bands that your router supports. This can improve network speeds and stability across your Wi-Fi for a better experience.

